

Setting up a React App with Propexo - Introduction
This video is an introduction to the Propexo dashboard and how to set up your first integration. This particular integration setup is for an Entrata integration and covers many of the common steps you’ll need to take to get your integration working.
Video Transcript (transcribed by AI)
Hi, my name is Nick. I am a co-founder and the CTO of Propexo, and I wanted to create a video here where we’re going to start to build a React app together using the Propexo API. We’ll go over some of the basics of how the API works and some of the features. I thought that the best way to do that would be just to build an actual application with you all.
Application Overview
Let’s dive in. What we’re looking at right now is an application, just a Next.js app that I built and I’m running locally on my machine. Although the React app is running locally, all of the interactions with the Propexo API will be directly with the sandbox, not from my local machine.
This app is currently interactable. These are four properties we’re looking at. This data is actually being pulled in from an Entrata instance. If you click on each of these properties, you’ll see a properties detail view to the right. You’ll see additionally units, residents, and leases down here, which don’t exist yet, but we’re going to build those out in future videos.
Exploring the Propexo API
I’ve prepared an initial call to the Propexo Sandbox API for properties data, and I have set up an integration with Entrata. When we make this call, we should see properties come in from Propexo that Propexo has retrieved from Entrata.
API Response Structure
The first thing you’ll notice is that there are two objects in this response:
- A meta object
- A results object
Looking at the meta object first, we see information like:
- Offset limit
- Order by
- Has more
- Total
Understanding Pagination
Starting from the top here, offset is for paging. This particular response only has four results in it, but in a production environment, you could have thousands or tens of thousands of results. Pagination is a key component of how the Propexo API works. The offset would be the number of items in the array that you’re paginating through at the time.
Limit Settings
The limit is by default set to 100. So only a maximum of 100 results will show in an array per page. That can be configured real-time via a query string parameter with a maximum, I believe, of 250.
Order By Configuration
The next thing is order by. This is an important feature because you may want to order the data in the array differently than what the default is. By default, if you don’t configure it, it will be ordered by created at and ID. ID ordering is not configurable - that will be enforced on every response. But other order by variables are configurable.
For example, if we set order by equals created at ascending, when I send this, we would expect this value to change from created at descending to created at ascending. And there you go - now created at ascending is the order of this array.
Has More and Total Parameters
The next thing you’ll see is has more and total. Has more just indicates if there are additional pages. If we were to change this limit to a limit of two, what we would expect here is:
- The limit to change to two to reflect that configuration
- Has more to change from false to true, indicating that there are additional pages to consume
When we send this with limit equals two, at the top you can see limit of two is there and has more is true, which indicates that although you’re seeing two results here, there are more results to paginate through. You know that total number of results is four in this case.
Working with Offset
Let’s look at the offset. If we add an offset equals one, looking at this ID ending in 1357, we’re going to offset one. The next ID here is 9883, so I would expect this current ID to not be in the results at all when I make this call.
Now you see the limit is still two and the offset is one, meaning that we’ve skipped one index ahead in the array. As expected, 9883 is now the first item in the array.
Investigating Missing Data
Looking back at our React app, we display:
- Complex name
- Address
- Total units (currently empty)
- Year built
- PMS source
If I’m building this, I’m wondering why total units is blank. If this is an expectation that I have as a developer to be able to populate the total units, then I need to know why that data does not exist.
Checking the Documentation
The first thing I might do is come over to the Propexo docs and go to properties. In the generic properties, you can see query string parameters we talked about (order by, offset, limit, etc.). There are additional pieces you can filter by, and those differ per request URL.
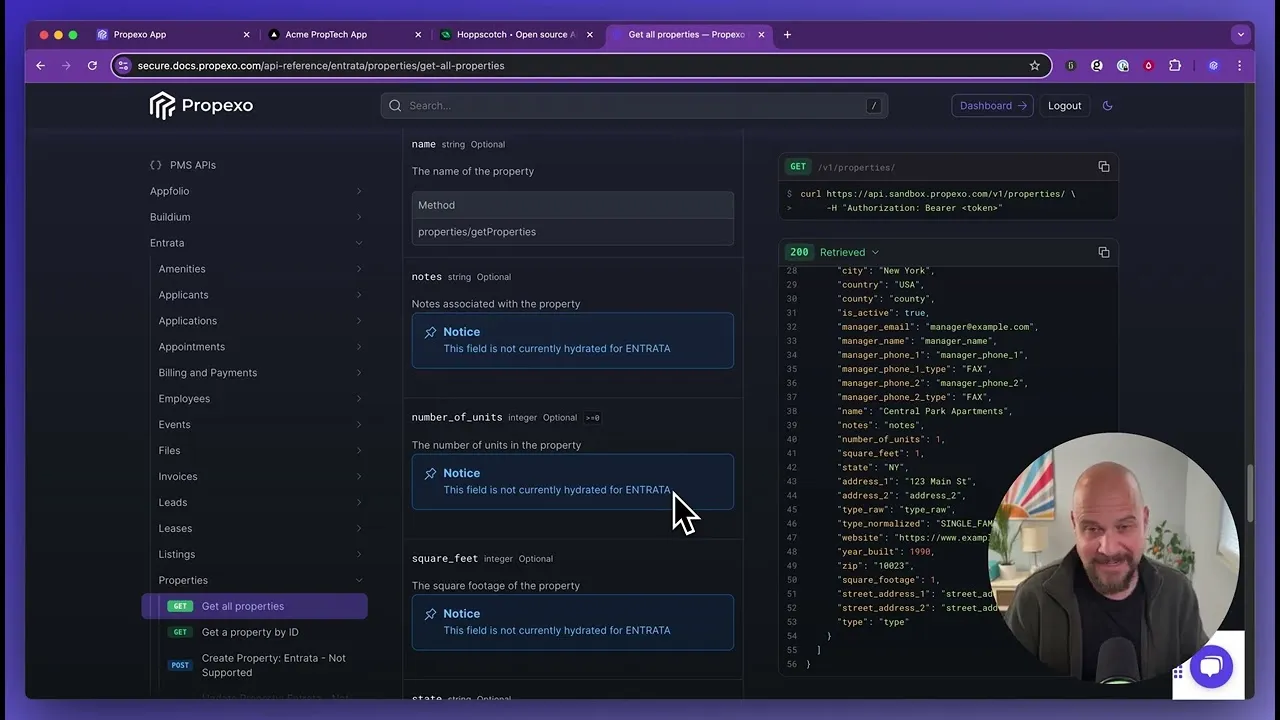
The most helpful information is in the PMS APIs section where we can specifically see what’s going on with Entrata. Looking under properties and scrolling down to unit count, you’ll see that the “number of units” field has a note stating “this field is not currently hydrated for Entrata.”
When you see that information in Propexo docs, we have specifically identified that that data is not available. This could be confusing because the data is available in Entrata’s portal and UI, but they do not expose the number of units in their API.
Understanding Data Availability
There could be other reasons that data is not available:
- New additions to the API
- Pending data hydration
- Missing documentation notices
- Null values due to:
- Incorrect property manager data entry
- PMS reporting issues
Feel free to reach out to us and ask questions as they come up. The docs are a pretty important component of your development practice and procedure, so make sure that you’re diving into those and understanding each of these scenarios.
Handling Data Updates
Let’s walk through a typical development flow. Say we notice that for Riverside Gardens, we’re seeing the address is “101 Test Street,” and we know that’s not real. After reaching out to our customer, they confirm it’s incorrect and update it in Entrata to “100 Elm Street.”
The update flow works like this:
- Data gets updated in Entrata
- Propexo pulls data from Entrata
- You pull data from Propexo
To get the updated data, we need to:
- Go to our Propexo integration
- Run a new sync to pull in the updated data
- Verify the address has been updated
Verifying the Update
After running the sync, we can check the API call again. Looking at the property we modified, we can see the address has indeed changed from “101 Test Street” to “100 Elm Street.”
Working with Deprecated Fields
One additional thing worth noting: we have both “street_address_1” and “address_1” fields in our response. Looking at the documentation, we can see that “street_address_1” is deprecated. When we deprecate a field:
- The field will still be there
- It will not be actively managed and updated
- We will not pull support for that field
- Any new changes or updates won’t include that field
In this case, you should use “address_1” instead of the deprecated “street_address_1” field. If we refresh our React app, we can see that Riverside Gardens now shows “100 Elm Street” as expected.
Conclusion
That’ll do it for this video. Look forward to seeing you in the next video where we will continue building this app.